
Creating a successful growing space in your poly tunnel begins with proper setup and maintenance. This comprehensive guide walks you through the essential steps of establishing a thriving environment for your plants using sustainable practices such as no-dig gardening and effective composting techniques.
Quick Navigation
- Setting Up Your Poly Tunnel
- The No-Dig Method Explained
- Weed Suppression Techniques
- Choosing the Right Growing Medium
- Pathway Design and Maintenance
- Natural Mulching Solutions
- Composting for Poly Tunnel Success
- Maintaining Soil Health
- FAQ: Common Poly Tunnel Questions
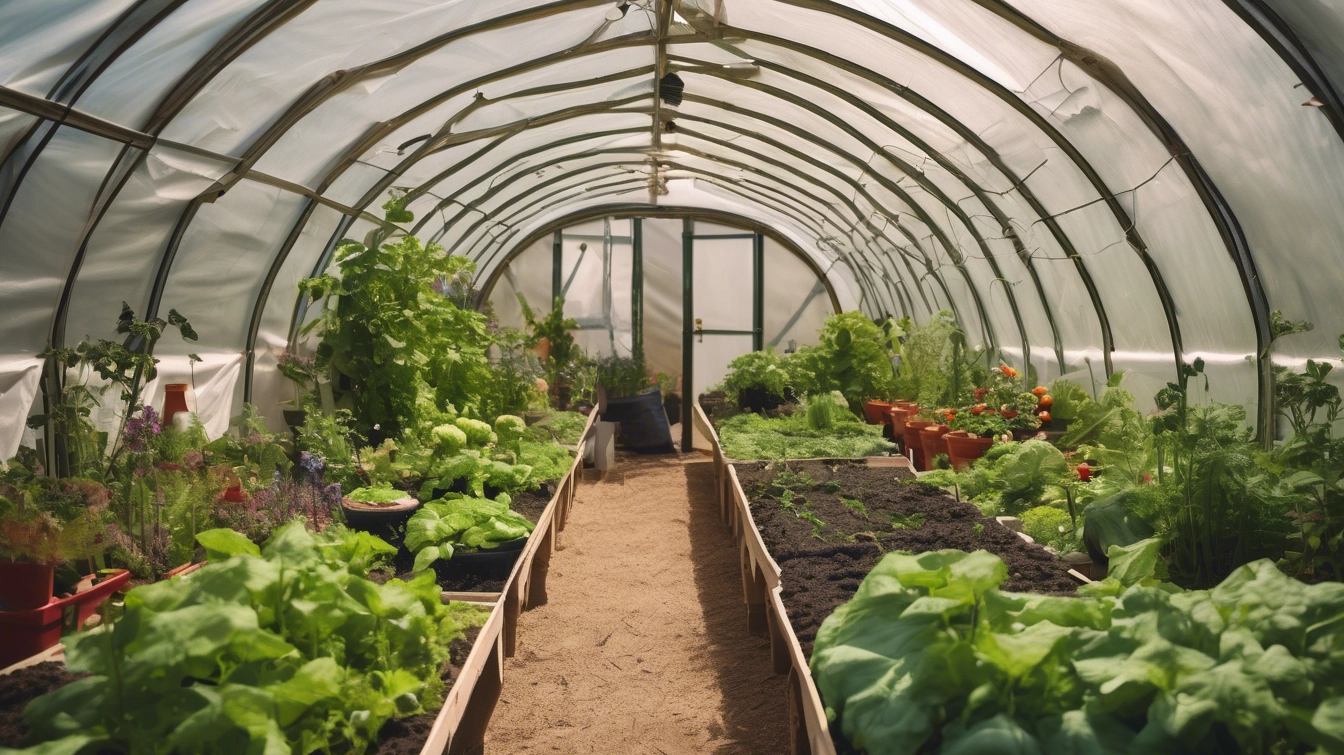
Setting Up Your Poly Tunnel
Getting Started: Two Effective Approaches
There are two main methods for setting up your poly tunnel growing space:
- Raised Bed System – Incorporates timber-framed beds with a central pathway
- No-Dig Method – Uses ground-level beds without timber frames
While both approaches have their merits, the no-dig method offers significant advantages for soil health and plant resilience. The techniques described below focus primarily on this approach but can be adapted for raised bed systems as well.
Initial Setup Steps
- Begin by clearing the designated area inside your poly tunnel
- Lay large sheets of cardboard over the entire growing area to suppress existing weeds and grass
- Ensure cardboard pieces overlap sufficiently to prevent weed growth between seams
- Apply your chosen growing medium directly on top of the cardboard base
Pro Tip: When laying cardboard, remove any tape or adhesives to prevent plastic contamination in your soil.
The No-Dig Method Explained
No-dig gardening is a sustainable approach that preserves soil structure and microbial life. Rather than tilling or digging, which disrupts beneficial soil organisms, the no-dig method builds soil health from the top down.
Key Benefits of No-Dig Gardening
- Preserves Soil Ecology: Maintains the complex network of fungi, bacteria, and beneficial organisms
- Reduces Weed Growth: Minimizes disruption that brings weed seeds to the surface
- Improves Water Retention: Enhances soil structure, allowing better moisture management
- Increases Disease Resistance: Promotes healthier plants with stronger natural defenses
- Saves Time and Effort: Eliminates the labor-intensive process of digging and tilling
The no-dig approach mimics natural ecological processes, where organic matter accumulates on the soil surface and breaks down gradually, feeding the soil from above.
Weed Suppression Techniques
Effective Cardboard Application
Large sheets of cardboard serve as an excellent weed barrier when establishing your growing area. For best results:
- Use thick, corrugated cardboard without glossy printing
- Remove all tape, staples, and adhesive labels before application
- Overlap edges by at least 6 inches (15cm) to prevent weeds emerging between sheets
- Wet the cardboard thoroughly after laying to speed decomposition and prevent it from blowing away
The cardboard will eventually break down, contributing organic matter to your soil while initially preventing weed growth.
Maintaining Weed-Free Pathways
For pathways within your poly tunnel:
- Apply cardboard as described above
- Cover with a thick layer of wood chips, gravel, or other pathway material
- Replenish pathway material as needed to maintain weed suppression
Choosing the Right Growing Medium
Mushroom Compost: A Superior Option
Mushroom compost offers exceptional qualities for poly tunnel growing:
- Nutrient-Rich: Contains a balanced blend of nutrients ideal for plant growth
- Beneficial Microorganisms: Introduces helpful soil biology that supports plant health
- Good Structure: Provides excellent drainage while retaining appropriate moisture levels
- Cost-Effective: Often available at reasonable prices, especially in bulk
- Sustainable: Repurposes agricultural byproducts from mushroom production
When sourcing mushroom compost, look for spent mushroom substrate that has been properly aged and composted.
Application Rates
For initial bed creation, apply mushroom compost to a depth of 4-6 inches (10-15cm) directly on top of your cardboard layer. For established beds, add a 1-2 inch (2.5-5cm) top dressing annually to replenish nutrients and maintain soil health.
Pathway Design and Maintenance
Creating Effective Pathways
Well-designed pathways are crucial for poly tunnel functionality:
- Width: Ensure pathways are at least 18 inches (45cm) wide for comfortable access
- Materials: Wood chips provide excellent moisture retention and eventually break down to enrich soil
- Layout: Design pathways to maximize growing space while allowing easy access to all plants
- Drainage: Create slight slopes or channels if necessary to prevent water pooling
Ventilation Considerations
Proper pathway design contributes to ventilation, which is essential in poly tunnels:
- Align main pathways with prevailing air currents
- Ensure adequate spacing between plant rows to facilitate airflow
- Consider the mature size of plants when planning pathway layout
Good ventilation significantly reduces humidity-related problems like blight, particularly in susceptible crops like tomatoes.
Natural Mulching Solutions
Sheep Wool as Premium Mulch
Sheep wool offers exceptional benefits as a mulching material:
- Superior Insulation: Regulates soil temperature, protecting roots from extremes
- Moisture Retention: Wool can absorb up to 20 times its weight in water
- Pest Deterrence: The texture deters slugs and certain crawling insects
- Slow-Release Nutrients: As wool breaks down, it releases nitrogen and other nutrients
- Biodegradable: Completely natural and enriches soil as it decomposes
Apply wool mulch in a layer 1-2 inches (2.5-5cm) thick around plants, keeping it slightly away from stems and trunks to prevent rot.
Other Effective Mulching Materials
If sheep wool isn’t available, consider these alternatives:
- Straw or hay (ensure it’s weed-free)
- Leaf mold or partially composted leaves
- Well-rotted compost
- Wood chips (best for pathways or around perennial plants)
Composting for Poly Tunnel Success
Creating and Using Compost
Develop a composting system near your poly tunnel to create a continuous supply of nutrient-rich material:
- Collection: Gather vegetable scraps, garden waste, spent crops, and appropriate kitchen waste
- Construction: Build a simple bin system with multiple compartments for different stages
- Management: Turn regularly, maintain appropriate moisture, and monitor temperature
- Application: Use finished compost as a top dressing for beds or mix into planting holes
Compost Tea for Plant Health
Enhance plant health with compost tea, a liquid fertilizer made by steeping finished compost in water:
- Fill a bucket one-third with finished compost
- Add water to fill the bucket
- Let steep for 24-48 hours, stirring occasionally
- Strain and apply to plants as a foliar spray or soil drench
This provides beneficial microorganisms and nutrients in a readily available form.
Maintaining Soil Health
The Living Soil Ecosystem
Healthy soil functions like a well-balanced immune system for your garden:
- Microbial Diversity: Encourages beneficial bacteria, fungi, and other microorganisms
- Nutrient Cycling: Supports the breakdown and availability of nutrients
- Disease Suppression: Creates competition that limits pathogen establishment
- Structural Integrity: Maintains soil aggregates for proper water and air movement
Ongoing Soil Management
To maintain and improve soil health:
- Apply annual top dressings of compost or well-rotted manure
- Utilize cover crops during fallow periods
- Practice crop rotation to prevent nutrient depletion
- Minimize soil disturbance by following no-dig principles
- Monitor soil moisture and adjust watering accordingly

FAQ: Common Poly Tunnel Questions
How do I manage temperature in my poly tunnel?
Answer: Temperature management involves several strategies:
- Provide adequate ventilation through doors and roll-up sides
- Use shade cloth during peak summer heat
- Consider thermal mass (water barrels) to regulate temperature swings
- Apply mulch to moderate soil temperature
When should I plant in my poly tunnel?
Answer: Poly tunnels typically extend your growing season by 4-6 weeks on either end. Start cool-season crops earlier in spring and continue growing later into fall. For warm-season crops, wait until night temperatures consistently stay above 10°C (50°F), even if this is earlier than outdoor planting.
How often should I water plants in my poly tunnel?
Answer: Watering frequency depends on several factors:
- Plant types and their water requirements
- Stage of growth
- Weather conditions
- Soil composition and drainage
- Mulch application
Generally, check soil moisture regularly by inserting your finger 1-2 inches into the soil. Water when the soil feels dry at this depth. Consistent, deep watering is better than frequent shallow watering.
Can I grow plants in my poly tunnel year-round?
Answer: Yes, with proper planning. Focus on cold-tolerant crops for winter growing in unheated tunnels, such as kale, spinach, winter lettuce, carrots, and certain herbs. Use additional row covers inside the tunnel for extra protection during extreme cold periods.
By following these comprehensive guidelines, you’ll establish a thriving, productive growing environment in your poly tunnel. The combination of no-dig gardening methods and thoughtful design creates an ecosystem that supports plant health naturally while reducing maintenance requirements.